You've tailored your resume for a product management role at a startup, a senior operations role at a Fortune 500, and a growth marketing position at a scale-up. Now you have six files on your desktop with names like "Resume_PM_v3_FINAL.docx" and no idea which one you sent to which company.
When a recruiter calls and asks about your experience with [specific project], you need to know whether that project is on the version they have. The chaos of unmanaged resume versions directly affects your interview performance.
Here's a system that eliminates the chaos in one afternoon of setup.
Why Multiple Resume Versions Are Necessary
Before the system, let's be clear on why this problem exists in the first place — because the solution is to manage it well, not to avoid it.
ATS systems require keyword matching. A resume that scores well against a product management job description uses different language than one optimized for a data analytics role. The skills are real; the emphasis and framing differ.
Different roles have different stories to tell. If you've done both strategic planning and hands-on execution, which half of your experience leads depends on what the role calls for. A single resume tries to do both and ends up doing neither particularly well.
Recruiters respond to specificity. A resume that clearly speaks to the role they're hiring for feels different from a generic one — even if the underlying experience is identical.
The answer isn't one perfect resume. The answer is a managed system of targeted versions.
The Master Resume: Your Central Document
The most important thing to build before you start creating versions is a master resume. This is a comprehensive, unsent document that contains everything you could possibly use across all your applications.
What goes in the master resume:
- Every job you've held with 6–10 bullet points per role (including bullets you've previously cut for space)
- 2–3 bullet variants for each key role: one emphasizing results, one emphasizing scope, one emphasizing skills
- Every skill, tool, and technology you genuinely know
- All certifications, training, and credentials — even minor ones
- Side projects, volunteer work, publications, speaking
- Multiple professional summary options targeting different role types
This document might be 6–8 pages. That's fine — you'll never send it. It's your raw material.
Build this once. Spend 90 minutes on a Sunday expanding your current resume into its full version. Every hour you spend on the master resume saves 30 minutes on each subsequent tailored application.
The File Naming System That Ends Chaos
The root of resume file chaos is inconsistent naming. Here is a naming convention that works:
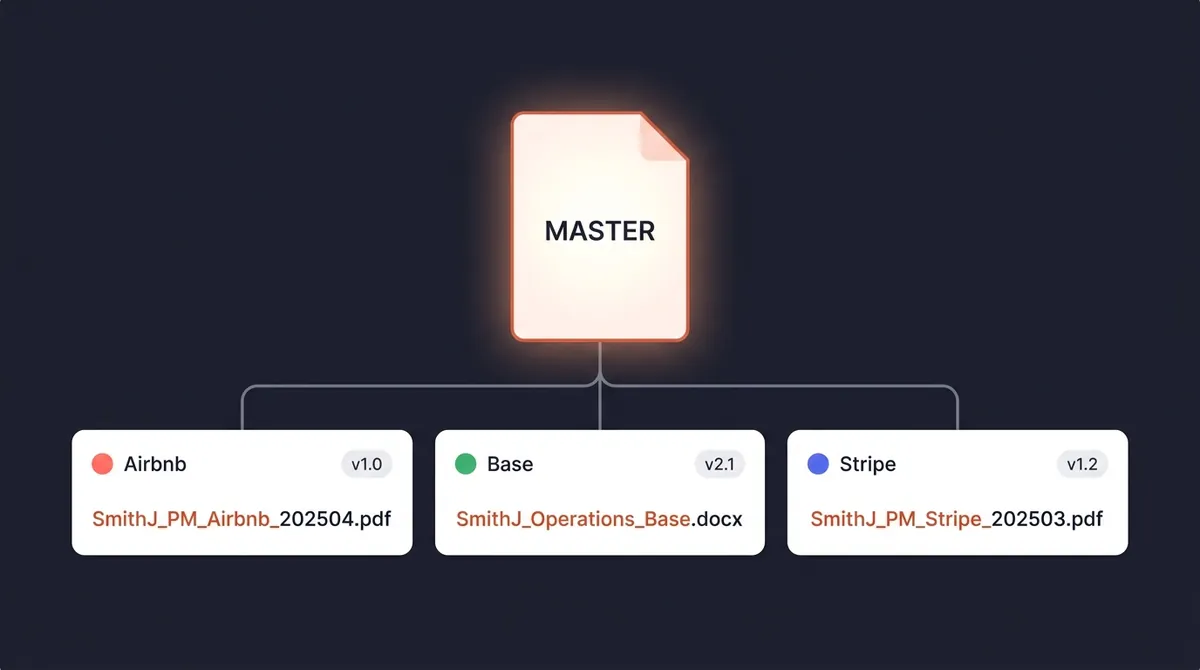
Format: [YourLastName][FirstInitial]_[RoleType]_[CompanyName]_[YYYYMM].pdf
Examples:
SmithJ_ProductManager_Airbnb_202504.pdf← sent to AirbnbSmithJ_ProductManager_Base_202504.docx← base template, never sentSmithJ_Operations_Stripe_202503.pdf← sent to Stripe last monthSmithJ_Operations_Base_202504.docx← operations base template
Two key distinctions:
- Base files (editable, never sent): Named with "Base" instead of a company name. Stored as .docx. These are your templates.
- Sent files (read-only): Named with the specific company. Stored as .pdf. Never edit these after sending.
This convention makes it immediately clear what you're looking at, what was sent versus what's a template, and when each file was created.
Folder Structure
Job Search 2025/
├── Resumes/
│   ├── Master/
│   │   └── SmithJ_MASTER_Resume.docx
│   ├── Base Templates/
│   │   ├── SmithJ_ProductManager_Base_202504.docx
│   │   ├── SmithJ_Operations_Base_202504.docx
│   │   └── SmithJ_DataAnalytics_Base_202504.docx
│   └── Sent/
│       ├── 2025-04/
│       │   ├── SmithJ_ProductManager_Airbnb_202504.pdf
│       │   └── SmithJ_Operations_Stripe_202504.pdf
│       └── 2025-03/
│           └── SmithJ_ProductManager_Notion_202503.pdf
├── Cover Letters/
│   ├── Base Templates/
│   └── Sent/
└── Applications Log/
Store this in Google Drive or Dropbox — not just on your laptop. You will want to access it from your phone when a recruiter calls unexpectedly, and you definitely don't want to lose it if your computer has a problem during your search.
How Many Base Templates Do You Actually Need?
Most job seekers need 2–4 base templates. The right number depends on how different your target roles are from each other.
Create a new base template when:
- You're targeting clearly different role types (e.g., individual contributor vs. manager)
- You're applying across two distinct industries (e.g., fintech and healthcare)
- The core framing of your summary and top bullets would be fundamentally different
Customize an existing base when:
- Same role type, different company or industry context
- Minor keyword adjustments for ATS optimization
- Reordering bullets to match a specific job description's priorities
The 15-minute customization of an existing base is the target experience. If you're spending 90 minutes on each application because you're building from scratch, you don't have enough base templates.
Tracking Which Version Went Where
This is the step that directly affects your interview performance — and the step most people skip.
Why it matters: You will be interviewed on the version of your resume they received. If you sent the Operations base but your Product Manager version has a project they ask about, you'll be talking about something that isn't on their copy. Confusing at best; a red flag at worst.
The tracking rule: Every time you log an application, record the resume filename.
In a spreadsheet, add a "Resume Version" column and fill it in immediately when you log the application. In OfferFlow, you can attach the actual document to each job card — before an interview, you open the card and the exact resume they have is right there.
This sounds like a small detail. It's not. When you get an interview call, you have 10 seconds to pull up the right document before the conversation starts. Having to dig through folders and guess is an avoidable source of anxiety.
When to Update Your Base Templates
Base templates aren't permanent. Update them when:
- You complete a significant new project worth highlighting
- You get a new certification or credential
- You've been in your search for 60+ days and are refining your positioning
- You notice a pattern in feedback (e.g., multiple interviewers asking about the same gap)
Don't edit base templates constantly — stability is the point. But don't let them go stale for months either.
When you update a base template, update the date in the filename: SmithJ_ProductManager_Base_202506.docx. Keep the old version archived — your sent files from previous months reference the older base, and you may occasionally need to see what you were positioning as at that time.
The Pre-Interview Checklist for Resume Versions
Every time you prepare for an interview:
- Open your applications log
- Find the specific application for this company
- Note which resume version you sent (filename)
- Open that exact file
- Read it as if you're the interviewer — what questions does it prompt?
- Prepare to speak to every bullet point and skill on that version
- If a project is on that resume, have a 2-minute story ready for it
This checklist takes 10 minutes and eliminates the most common interview preparation gap: talking about experience in a way that doesn't match what the interviewer has in front of them.
Common Mistakes to Avoid
Saving over a sent version. Once a file is sent, it becomes a record. Never edit a sent file — create a new one.
Relying on Google Docs version history instead of named files. Version history in Docs is difficult to navigate when you need to find what the document looked like on a specific date. Named files in organized folders are faster and more reliable.
Using vague names like "Resume_final_updated_v2." This will confuse you in three weeks. Use the naming convention consistently from the first application.
Not keeping rejected application resumes. Delete nothing. You may be contacted about a role months after applying. And your historical files show how your positioning evolved — sometimes useful context when evaluating what's working.
Getting Started
If your resume files are currently chaotic:
- Create the folder structure above in Google Drive
- Spend 90 minutes building your master resume
- Create 2–3 base templates from the master
- Move all your existing sent resumes into the Sent folder, organized by month
- From your next application forward, follow the naming convention and log the filename in your tracker
The setup takes an afternoon. The payoff is months of clarity, faster applications, and confident interviews.